 I prefer the turned under edge for appliqué and that was why I will be showing you how to do the Freezer Paper method in this tutorial. However, any method of applique may be used for this project. I find it helpful to have all the layers of fabric glued in place before I start to sew. This method makes for a great take-with-you project. I hope you like my way to appliqué.
♥
You will need to go HERE to download the four-page pattern. Note the registration marks (X) and match them up when putting the pattern together.
You will need to go HERE to download the instructions for appliquéing with freezer paper. This will be helpful when looking at the following pictures and trying to follow my directions.
 After you have downloaded the design and taped the two pieces together set it aside as this will be used for placement reference. Then copy the various parts of the pattern onto freezer paper (FP). Please refer to the FP directions that you downloaded for complete instructions on how this should be done. You should make a template for the skirt, the legs, the shoes, and the buckle. There is no need to make a template for the spider as that will be done in a different way.
 Sandwich your drawn template (or do as I did and place your drawn template on top) between two pieces of FP and iron together (refer to FP directions that you have downloaded). Some people use only one piece of FP and I admire the way they can do that. I never can. I have a heavy hand and tend to splash the wet starch onto the FP and it wrinkles and distorts the design. A thick, cardboard like template made of three pieces of FP keeps the starch from soaking into the FP and distorting the template. It’s easier to handle and also much easier to pull the fabric around the stiff thick template. This kind of template can also be reused over and over.
 Once this thicker template has cooled, cut the pattern from the freezer paper, being careful to make a smooth cut, leaving no bumps as they will show up later in your fabric.
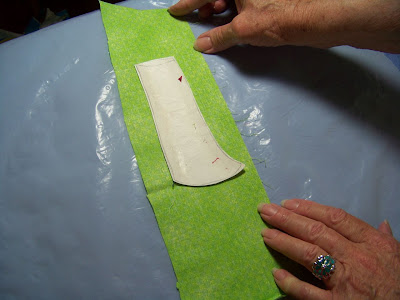 The following directions are for the baggy socks only. This picture is to show you that the fabric for the legs needs to be longer than the template to allow extra material for scrunching.
 In this picture I am showing you how to make the baggy socks. This step need only be taken for the baggy socks. Follow the FP directions for the other pieces of the pattern. For the socks, place the template down on the ironing board, waxy side up, then scrunch the fabric over the template, (right side of the fabric facing up) and iron the wrinkles in place.
 Iron in the wrinkles. They will adhere to the FP. This is what is so great. There is no right or wrong way to iron wrinkles. Be creative and do what you like.
 This is what it will look like from the other side. I apologize that the template looks so scorched and dirty. I thought about making new ones, but wanted you to see how sturdy these templates are. I have made 15 witch’s shoes blocks with this same template, so it really was well used and worth the effort in the beginning when making the templates.
 Once that has cooled, cut your fabric, leaving a scant ¼ inch of fabric beyond the template.
 Now brush starch onto the fabric extending from the template. You can refer to the FP directions you have downloaded for more information. You will note in the picture that I use canned spray starch. I just spray a small amount of starch into a small jar and then use that to dip in my brush. I have used other forms of starch but nothing seems to work as well for me as does spray starch.
 Gently pulling the starched fabric around the template, press with an iron. The iron should be hot enough so that you hear a sizzle when placing the iron on the wet fabric. Sometimes a stylist will help you grab the fabric and keep your fingers away from the hot iron. Apply pressure to the iron, and leave the iron on the fabric long enough so that the fabric dries. I have found that a heavier iron works best. A small Clover iron does not work for me.
 Turn the template and fabric over and gentle tap with the iron.
 Once that is cool, carefully remove the fabric from the template.
 Iron the fabric again, tapping lightly to make sure everything stays in place.
 Turn and tap lightly with the iron again. Now place this aside and go to the next template. Make the other leg, then go on to the shoes.
 For the shoes and the other templates lay your fabric wrong side up on the ironing board. Then place your template waxy side down on the fabric and iron. Once cooled cut a scant 1/4 inch from the template. The shoes are a little tricky because of the inner curves and the pointed toe.
Carefully clip the inner curves all around the shoe.
 Brush with starch.
After you have brushed the starch onto your fabric, carefully fold the fabric down at the point (no need to iron yet).
 Now fold in one side (do not iron yet).
 Then carefully fold over the other edge and iron everything in place.
 Your point should look something like this.
Now we deal with those curves. The curves have already been clipped and starch applied. Now you can iron.
 Sometimes you can let your iron do the walking, and by pushing the nose of the iron beneath your fabric it will coax the fabric back and in place.
 Complete the process around the shoe, turn over and press. Once cooled, you may remove the template.
 You can make the skirt the same as we have demonstrated above.
 The buckle is easier than it looks. Place the buckle template on the fabric and iron as you did the other templates. Once cooled, cut the fabric a scant ¼ inch from the template. Cut a small circle around the inner opening of the buckle. Clip around the curves. Brush with starch and iron, first turning the outer edges inward, then turning the inner edges toward the outside. Cool and remove template.
 Once you have all your pieces ready, place them onto your background fabric. I used a 13 inch square of fabric for the background and cut down to 12 ½ inch after the applique and all embroidery was finished. Pin the pieces in place.
 Once you are certain that you have every piece where you want it, apply small dots of basting glue (Roxanne’s glue, Basting glue, or Elmer’s glue) to the inner edge of the turned under fabric. Stay away from that outer edge as that will be where you will sew. I allow a few minutes to dry and then remove the pins. Thread gets tangled around pins. Now you are ready to stitch everything in place. This can be done by hand or machine.
 Now for the spiders. Use Wonder Under or Heat-N-Bond to cut small spider bodies, then iron in place onto your background fabric.
 Use a marker to mark the spider web and to mark the spider legs. With two strands of floss, embroider the spider web and legs.
 Wa La….The final product. I hope you enjoy making your Halloween block as much as I did.
 ♥
Happy Quilting, Caroll
0 comments:
Post a Comment